How to Create free e-mail account with Your domain name?
Step 1 - Sign up your domain for Google Apps:
- specify that you are an ‘Administrator’, not an ‘End-user’
- enter the domain name as follows: yourdomain.com
- click the ‘Get Started’ button to continue

Step 2 - Create an account administrator & enter the relevant organisation information
- use an existing email address
- tick the box to indicate you understand about the required DNS changes
- enter the organisation info


Step 3 - Create your first administrator account
- select an username
- Type a password
- accept the terms & conditions

Click ‘I accept’ & Google Apps will send you a welcome email detailing next steps. You can ignore the email but keep it around for future reference. Please make a note of all these details as these are the domain administrator details and will be required at some stage in the future
Verifying ownership via the ‘Upload an HTML file’ method
The next step involves activating your Google Apps account and you need to verify that you own yourdomain.com.
Step 1 - Select the ‘Upload an HTML file’ option

Upload the HTML File in your cpanel
To create MX records for a domain:
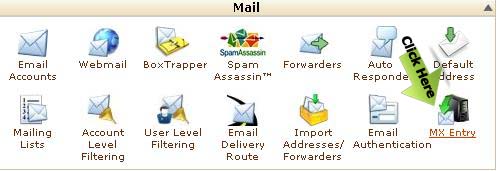
- Log in to the Cpanel for your domain.
- Navigate to an MX record maintenance page. MX records are special DNS (Domain Name Service) records, and are often located under sections titled “DNS Management,” “Mail Server Configuration,” or “Name Server Management.” You may need to turn on advanced settings to allow editing of these MX records.

Delete any existing MX records before entering new MX records.
Add an MX record for the email server.
Enter the fully qualified server name, such as ASPMX.L.GOOGLE.COM. Many domain providers also require a trailing period at the end of the server name.
Set the priority for the record.
Enter the fully qualified server name, such as ASPMX.L.GOOGLE.COM. Many domain providers also require a trailing period at the end of the server name.
Set the priority for the record.

MX Server address Priority
ASPMX.L.GOOGLE.COM. 10
ALT1.ASPMX.L.GOOGLE.COM. 20
ALT2.ASPMX.L.GOOGLE.COM. 20
ASPMX2.GOOGLEMAIL.COM. 30
ASPMX3.GOOGLEMAIL.COM. 30
ASPMX4.GOOGLEMAIL.COM. 30
ASPMX5.GOOGLEMAIL.COM. 30
The Google Apps Dashboard
Once in the Google Apps dashboard the first step is to activate email: click the link below the email icon and on the next MX records screen say ‘I have completed these steps’ - we have already made all the appropriate DNS entries for your domain.
After this step the dashboard will state how long before email is activated: they say 48 hours but it’s usually within the hour.
Comments
Post a Comment